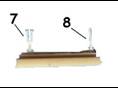
Step 1: Take part 1 and glue it to the bottom of the
hull of the Sdkfz 250/1 as can be seen on the image. Then take part 2 and wrap around it the thickest of the
two metal wires provided as shown on the image. Best is to do this by using a pair of fine tweezers. Once you have
done this cut out part 3 and dry fit it together with part 2 in the hull interior as to be sure of their correct
place. Use the images below as a guide.
TT005: Sd.Kfz.
250/5 Neue Art - 1/72 Scale
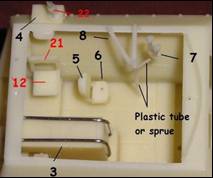
Step 2:
build the remainder of the interior of the 250/5. The parts indicated in red are parts which are
from the basic 250/1 kit.
First complete the building of the seats (part 5 + 6 and 12 + 21). Once these are done, complete the rest
of the interior according
to the plan of the Sdkfz 250/1. After that you can join the upper hull and continue with mounting
parts 4, 7, 8 and 22. Parts
not needed from the basic 250/1 kit are 9, 19, 32 and 33.
Step 3: The final step consists of adding the antenna. A thin metal wire is provided for this, which should be cut to an approximative lenght of 2.5 cm. This length should attached to part 22 which is the antenna mount. On top of the length of wire you should very carefully mount part P23 (star shaped antenna). The ‘arms’ of the antenna should all be pointing upward in an angle of about 50°.

Besides the
parts listed there is also one metal rod provided which are not shown on the
image. This can be used
to create the antenna