
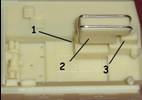
Step 1: Take part 1 and glue it to the bottom of the
hull of the Sdkfz 250/1 as can be seen on the image. Then take part 2 and wrap around it the thickest of the
two metal wires provided as shown on the image. Best is to do this by using a pair of fine tweezers. Once you have
done this cut out part 3 and dry fit it together with part 2 in the hull interior as to be sure of their correct
place. Use the images below as a guide.
TT002: Sd.Kfz.
250/3 Neue Art - 1/72 Scale
Step 2: build
the remainder of
the interior of
the 250/3 with
the parts of the
250/1 interior.
Use the image beside
as reference,
part details are
on the plan of the
250/1
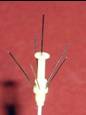
Step 3: To
build the antenna and mount, glue part 4 to the upper hull of the 250 as shown
on the image. Next attach
part 22 from the 250/1 kit to part 4(see image for position). Now take part 7 and connect it with part 8 (the length of plastic rod). Now take the
remaining thin metal rod and cut off 6 lenghts of 7mm each. 5 of these should very carefully be connected with the
upper half of part 7 as shown on the image. The 6th piece of metal rod should be mounted vertically on top
of part 7. The whole assembly should then carefully be fitted to the antenna fitting on the hull which was
made at the beginning of this step.


Besides the parts listed
there are also two metal rods provided which are not shown on the image.


Now continue
to proceed with the rest of the interior and kit
according to the plan of the 250/1. Parts not to be used are 12, 19, 21 and 33. After
completing the kit, continue with the final construction of the antenna.